Putting the Squeeze on a Rattler
Contributed by: masodo on Monday, March 26 2012 @ 08:58 am UTC
Last modified on
UPDATED STORY!
How I DIY'd my rattling catalytic converter.
[The story you are about to read is true. The ideas presented here are for entertainment only. This is not to be misconstrued as advice. If you choose to follow the trail I have blazed be aware that your results may vary. You may be seriously injured or even killed by trying to duplicate the procedures presented in this tale. Proceed with caution.]
The cost to replace my catalytic converter was enough to persuade me to put up with the annoying rattling from underneath my truck for longer than I care to admit. At first I thought the heat shield was loose (I have had that happen in the past) and a spot weld or two would likely shut up the rattle. However, on closer inspection I discovered the heat shield was firmly attached.
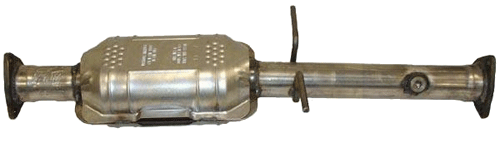
With the engine running at idle there is no mistake that the catalytic converter is the source of the clanking rattles. It must be that the guts of this thing are loose and causing the racket. So, resigned to the fact that it must need to be replaced; it's off to the interwebs to prepare myself for the inevitable.
- - - -
It's just a four-banger GMC Sonoma so how bad could it be? Well - as it turns out - pretty freakin' bad (relative to my bank account.) My first results on a search for the cost of the item showed upwards of $400 (yikes!) but a shrewd shop surf had it closer to the 175 to 200 mark on an "OEM" grade replacement. You just know though, that this is only a starting point. If I am going to go to the trouble of disconnecting the catalytic converter from the system I might as well at least think about replacing the whole exhaust system (I mean really.)
I seriously hate working on rusty old exhaust systems (mainly because I lack the proper tools for that job) and generally choose to leave that work to the professionals (aka the boyz wit da toyz.) So at this point I'm thinking this could turn out to be (idk) $12~1500 - easy. That's is a whole lot of money to throw at a rattle that otherwise is having no real impact on the function of my transportation - I will just have to live with the noise. It only rattles at idle so I if turn off the engine at the drive-up windows and look straight ahead at the stop lights, think of all the money I'll save.
Oh my Lord! It has been nearly a year now... I'm about to go out of my ever lovin' mind!! Make it stop! Make this noise go away! I am about ready to get the hack saw and cut the darned thing off. I can get a pipe for - what $15? - and put it where this rattle trap used to be. Clamp it on with muffler clamps and return to life as it was pre trauma. But hell, I might as well just replace the thing if I am going to go to all that trouble. Aaaagh!
Bink! <== a light bulb ignites overhead. Eureka! & "By George I think I've got it!"
If the rattling stops as the engine accelerates then the blow of exhaust must be pushing the guts into enough of a bind to stop the inner vibrations - hmmm. So I set to work on my diabolical plan. Whoaaahahahaha.
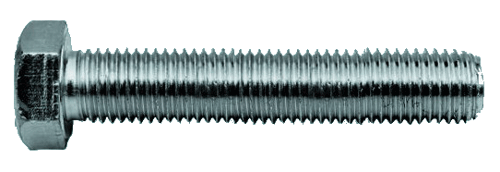
Now I may not have the tools to do proper exhaust system work but I do got me some tools and stuff. What I need is a good long bolt. Here we go... a 5-1/2" - 5/16" course threaded bolt - should do nicely... find a flat washer, a lock washer and a nut to fit... and danged if I don't have a 6" long drill bit to suit.
The drill-with-bit device is about 16 inches long but the clearance underneath the truck is more like 12. So I get the jack and raise up the corner I need to work under (taking special care to use wheel chocks and a proper jack stand - no sense in killing myself over this project.) Since Daddy didn't raise no fools, I also don my protective eye-ware. Time to scoot on down to the belly of the beast...
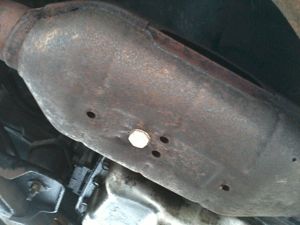
So the plan is to take this here drill-gun and shoot a hole straight through the middle of that bean can there. Kapow - Zingo! A perfect shot - it's a good thing I am wearing these glasses too, because the core of this can is reduced to a fine powder and blasted right at me by the air coming from the drill. It's a clean "through and through" though. Slipping the flat washer on the nut I plug up the hole and reaching around to the back side of the can I drop on the lock washer and follow with a twisting on of the nut. With a 17mm boxed end wrench on the dark side and a 17mm ratchet on this side I set about putting the tighten-up on this kit.
Did I say tighten? No - really - I mean tighten. I am going to smash the wiggle room out of this thing. So I tighten 'till the can is visibly squished and go start the motor and lo and behold the damn thing is still rattling. Bummer. What a massive waste of time. I really had such high hopes for this plan. So now with the added adrenalin that can only be gained from anger directed toward machinery I dive back into the scene of the crime and tighten the screw with every intention of smashing the can flat if I have to.
After 4 or 5 more grunting turns of the bolt I figure - surely to goodness - this has to be enough. Back to the cab... Turn the key... "Oh sweet mystery of life, at last I've found you!" I'll be go to hell - the rattle is no more and I am so proud of me!
Now when I pull up to a light I get the sense that my engine has stalled. But it's all good.
I don't know how this is all going to play out; Will I get a check engine light? I haven't yet. Will my fuel consumption increase or performance decrease? So far so good. I'll let you know if anything bad happens. I fully intend on replacing the exhaust system when the time is right (assuming the credit card gets paid down by then) but for now I can return to the life I had before all hell (aka catalytic converter guts) broke loose. I enjoy driving again and that's a good thing because I certainly do enough of it.
==================================================================================
UPDATE:
(Tuesday, June 26 2012 @ 12:14 PM MST)
Well that was an interesting experiment that bought me about 3 months in my effort to delay replacement. This past weekend however, I replaced my sick old catalytic converter with a brand-new-store-bought one.
So here is the low-down...
I got about a week out of my "CC" squishing before the rattle started up again. I tightened the bolt another turn or two and got another couple of days before I had to do it again. A couple days later the rattle returned but I convinced myself that it was not all THAT objectionable so I gave up on the chore of choking out the rattle.
Meanwhile it was about 4 days into the modification that - while merging on to the interstate - my "Service Engine Soon" light came on. From that day on the truck was noticeably lacking pep and I knew I had to get serious about replacing the "can full of rocks" with a proper catalytic converter.
Fathers Day brought with it a very welcomed gift card to Harbor Freight in an amount sufficient for me to acquire a set of vehicle service ramps. So I could now safely elevate the undercarriage without the need to resort to jack and stands.
The catalytic converter was purchased on-line from my neighborhood Advance Auto Parts[*3] store. I was able to get a substantial (promotional) savings and still picked it up in-store avoiding shipping charges. When all was said and done, I came away with a new catalytic converter for under $200 and some hard-knocks knowledge that is bound to serve me well into the future.
Hints, Tips and Advice for replacing the catalytic converter in a 2000 GMC Sonoma:
- Obviously the first piece of advice would have to be "Hire a professional," but chances are if you are driving such a vehicle then you are a tight-wad and a do-it-yourself-er or otherwise not predisposed to giving up any more of your hard-earned cash than you have to.
- My new converter did not come with any mounting hardware. I had to get gaskets, nuts and bolts, washers and a pair of those rubber exhaust system hanger dealies.
- The night before undertaking the dirty deed, I soaked all the rusted flange bolts with "Rust Eater" penetrating oil and they were dosed again several times throughout the project.
- You should disconnect the wired plug to the O2 sensor before you begin. I was fooled for a moment by the fact that the plug uses a tethered retaining pin to prevent the thing from coming unplugged. You will have no problem now that you are armed with this knowledge.
- It is foolish to think you can use 12 point sockets or wrenches to remove those critters, so grab the appropriate 6 pointers or simply resign yourself to the fact you are going to need a good pair of locking pliers (AKA vice-grips.) Of the six bolts I had to remove: the first I rounded off and had to resort to loosening with a 4Lb hammer and cold chisel. the next came off easily with a 6 point boxed-end wrench. All the remaining bolts were removed with the vice-grips.
- Break out the propane torch. You will not be able to complete this job if you do not use a torch to heat up the nuts before attempting to remove them. I would heat those guys till they are glowing orange then hit 'em with some penetrating oil (SSSSSsssss.) Remove them while they are still hot. If you do not use this technique you will round off the nut and go off in a huff looking for hacksaws, angle grinders, Dremmel tools, chisels and any other number of solutions to the problem you have created. If you don't have a propane torch - I'm telling ya' - get one or stay on the sofa.
- The top flange bolt on the front end of the converter seems to be all but accessible and you may be tempted to go at it with a deep-well socket on an extension - don't waste your time... first remove the bottom two on the front flange then move back and remove the rear three nuts. You can then drop the converter enough to get plenty of access to the front-topper with your locking pliers.
- You will need your "Rust Eater" oil and torch again to remove the O2 sensor from the unit. Soak base with the oil and heat the surrounding pipe before attempting removal.
All in all it was a Saturday well spent. The rattle is gone and the power is back! The check engine light is still on though. I tried disconnecting the negative battery cable for a few minutes but that did not reset it. I will have to see if the autoparts guys can do a reset for me (I hear they might.)
Good luck to those who decide to DIY their catalytic converters. Just enter into the project with the knowledge that you will save all kinds of money and enjoy yourself in the process. When the work is done just poor rubbing alchohol on your hands and smile - you done good.
UPDATE-II: Check engine light is out. I just had a loose wire on inflow temp sensor.
[tag:BlogDogIt auto mechanics diy tips]